MiniWerks

Fine Handbuilt Models from around the World

Latest Models

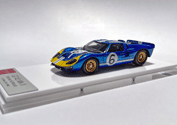
Ford GT40 Mk.II Holman & Moody 24H Le Mans 1966

Ford GT40 Mk.II Holman & Moody 24H Le Mans 1966

Last Two! Ford GT40 Mk.II Holman & Moody 24H Le Mans 1966 Lucien Bianchi/Mario Andretti. Brand New.

» See more...

Welcome to MiniWerks Online!

The focus here is representing high–end 1/43 scale handbuilt models from the World’s top brands, as well as pieces from internationally renowned independent builders.

Mike McCormick signature

MiniWerks Forum
Home | Profile | Register | Active Topics | Members | Search | FAQ
 All Forums
 General
 1/43 scale Handbuilt Models
 Applying decals

Note: You must be registered in order to post a reply.
To register, click here. Registration is FREE!

Screensize:
UserName:
Password:
Format Mode:
Format: BoldItalicizedUnderlineStrikethrough Align LeftCenteredAlign Right Horizontal Rule Insert HyperlinkInsert EmailInsert Image Insert CodeInsert QuoteInsert List
   
Message:

* HTML is OFF
* Forum Code is ON


T O P I C    R E V I E W
Sam S. Posted - 01/31/2022 : 19:40:13
I recently bought a 1/43 MakeUp model based on real car, and included was a pair of decals for the rear flanks, as apparently the real car didn't initially have them. I used to assemble models in my youth, and applying decals was a simple matter of soaking and placing decals. However, from watching a few tutorials there are now all sorts of solutions to apply before and/or after.

The decals in question won't be placed over gaps, but will be on a curved surface. I'm unclear whether using any of the various solutions will mar or cause a mismatch with the existing paint finish.

Any tips?

MiniWerks :: Fine Handbuilt Models from around the World :: Contact MiniWerks :: MiniWerks on eBay © 2014 Mike McCormick. All rights reserved   Go To Top Of Page
 
Snitz Forums 2000