| Author |
 Topic Topic  |
|
914joe
USA
206 Posts |
 Posted - 04/10/2011 : 05:17:36 Posted - 04/10/2011 : 05:17:36


|
| Nice!!! Love the dash details... That's going to look amazing. I would have never thought of clearing over windows befor seeing you do it on an earlier build. Now it's something I'll always do when there are decals on the windows. It also works great for removing blemishes from vacuforms. Keep up the great inspiring work. |
 |
|
|
gdist43
Japan
32 Posts |
Posted - 04/18/2011 : 04:40:04

|
I spent time to paint the cockpit part last weekend. Actually I had the wrong idea about the switches on the dash board... they may be push-pull type and I remade them now.

I cast doubt on the correct color of the original seatbelt in the 1970 Le Mans 24hours race in my blog and then got some responses. However, I am increasingly-confused!

|
|
|
|
rossocorsa
Portugal
346 Posts |
Posted - 04/21/2011 : 14:07:26
|
Hi Hakihiro, I have the same doubt about the seatbelts colour but maybe the red is the right choice,
on this photo from the car today, they are red
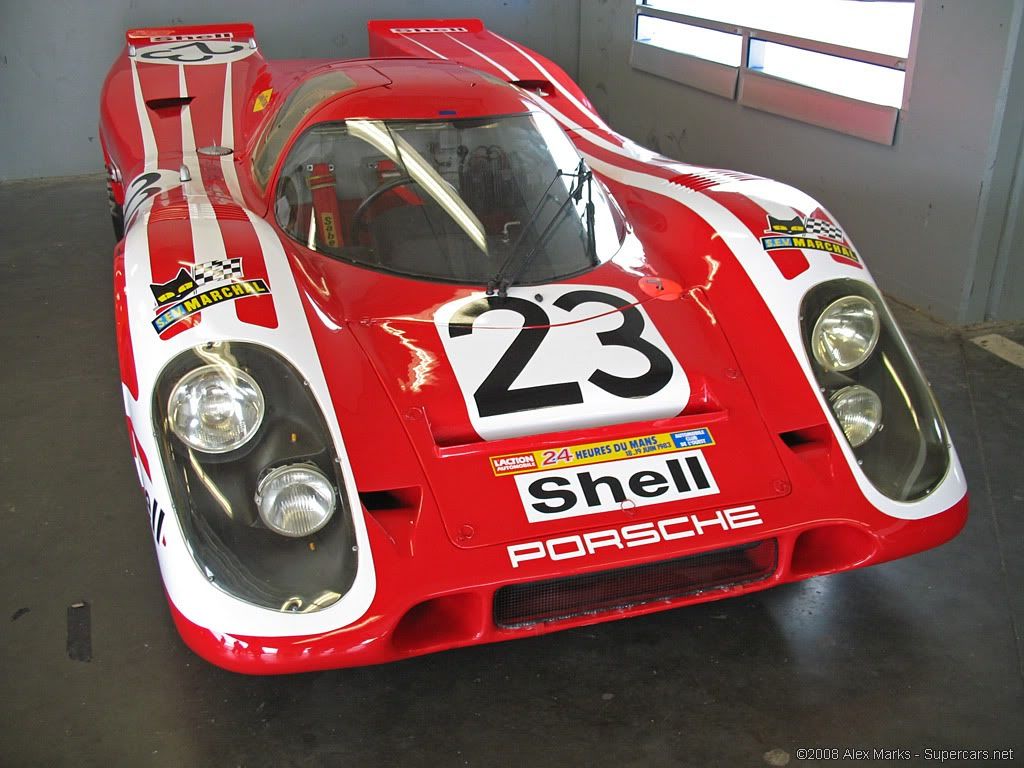
on this photo from LM 1970, they appeared to be red
the cockpit looks amazing. |
|
|
|
gdist43
Japan
32 Posts |
Posted - 04/24/2011 : 21:01:24
|
Thank you rossocorsa for showing a good reference photo of seatbelt in 1970. I will paint it red but I have to correct some inappropriate details of my 917 cockpit before painting.

I added the turn signal lever on the reft-side or the steering column and then removed the under part of the photo-etched belt as the 6 points harness system had not appeared yet in early '70s. The oval hole on the driver's seat was filled with epoxy putty.

I test-fitted the brass mesh which was plated with a solder into the opening of the front radiator.

The windshield wiper and the washer nozzle were test-fitted, too.

Now I'm trying to figure out how to make this number lamp. The aluminum body with 0.1mm thickness base plate may have a good result. I wish I could complete this model until this weekend...
|
Edited by - gdist43 on 04/24/2011 21:10:14 |
|
|
|
David
109 Posts |
Posted - 04/25/2011 : 00:56:34
|
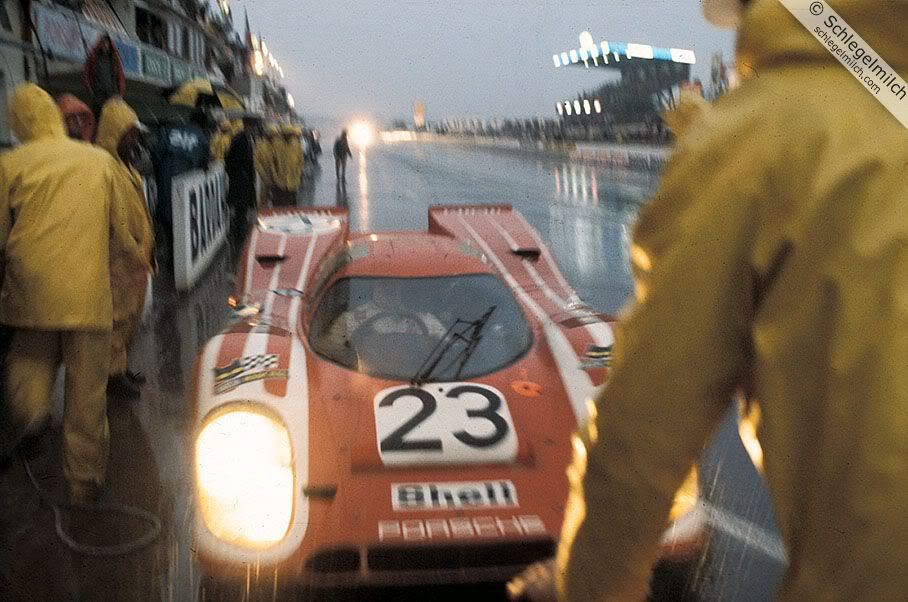
After many average builds from some European builders, considered as "masterpieces", this is a real stunner. Did you notice that on the real car there was a light on the right hand side? Also have a look at page 143 of this thread of the Duegi forum: http://www.forum-duegieditrice.com/viewtopic.php?f=10&t=11726&start=2130
In the photo I posted it seems quite evident that the seatbelts were red. |
|
|
|
gdist43
Japan
32 Posts |
Posted - 04/27/2011 : 18:15:42
|
David, thank you very much for posting the reference photo. I will paint the belt red and apply "RePa" logo on shoulders later... today I update wheel and tire part.

After painting thinner-down matt black with a brush, I sprayed dark grey lightly on the wheels.

I test-fitted the wheels with the Fujiya's patterned tires. They looks too bold for the Provence Moulage's body, so I shaved the tread and reduced the diameter of the front tires.

I wanted to replicate a characteristic blue strip on the sidewall of the GoodYear in 1960-70s, anyway. The aluminum jig to fix the tire to my motor tool was necessary...

It was very hard to draw a fine strip even using the jig. After continuing process of trial and error, I've got this first one.

I applied GoodYear decal on the strip, and then attached the brake unit.

Not so bad, is it? |
Edited by - gdist43 on 04/27/2011 18:25:05 |
|
|
|
Ferrarinut
USA
1489 Posts |
Posted - 04/27/2011 : 19:53:00
|
| Not so bad? I would say unbelievable! And to think this started as a simple Provence Moulage kit. The blue stripe on the tires is amazing, I have never seen this technique and would not believe it if not for your photos. I think you could be a neurosurgeon. :-) |
|
|
|
David
109 Posts |
Posted - 04/28/2011 : 12:08:52
|
| Words fail. |
|
|
|
johnvh123
Canada
2 Posts |
|
|
gdist43
Japan
32 Posts |
Posted - 05/05/2011 : 16:59:34
|
I wish I could think of something to reply for your compliments... but just say thank you. The beginning of today's update is the seatbelts.

I fully remade them with 1.2mm width nickel silver strips. The square buckle looks more classical than the previous one, however, I'm not sure it was true in the real car in 1970.

I twisted 0.2mm brass line around an axis of 1.4mm drill and chopped it to make small rings as the funnel edge.

I painted them with light brown and then added fuel hoses. They are actually styrene, made by heat-extending with a junk sprue of some plastic-model kit... no need for painting, very easy to bent and fix on the base plate with Tamiya cement.

I test-fitted the funnel unit to the body. Hard to recognize in this image but you will be able to see something through these oval holes with the naked eye.

The rear window was made with 0.1mm PVC sheet. Never forget to add the rear view mirror which consist of two-ply nickel silver strips. |
|
|
|
914joe
USA
206 Posts |
Posted - 05/05/2011 : 18:19:00
|
| Awesome!!!!! |
|
|
|
LaSource
356 Posts |
Posted - 05/06/2011 : 00:26:59
|
| It is such a pleasure to follow your build process. |
|
|
|
pierotecchio63
Italy
39 Posts |
Posted - 05/06/2011 : 06:35:35
|
| Mindblowing! |
|
|
|
gdist43
Japan
32 Posts |
Posted - 05/11/2011 : 08:25:43
|
It's about time to finish the 917 interior and I just fixed the tires today... it leaves a few work behind.

I made an extinguisher with 2.0mm brass line. Both belts were made with 0.3mm nickel silver strip.

I painted the extinguisher red and applied some junk decal. The small ignition units were combination of Tameo's photo-etched parts and brass pieces.

I glued them on the bulkhead and added some cords. The tight-fit windshield brought some problems around the dashboard. I spent much time to adjust it.

Finally I closed the body and ready to set the tires. The alignment of the sub-frames must be important for this model, so I used a block of sticky as a jig with gluing.

Looks better to displace the axis of the rear tire slightly back if you have an opportunity to build this kit.
|
|
|
|
pierotecchio63
Italy
39 Posts |
Posted - 05/12/2011 : 04:13:06
|
| Beautiful as usual! |
|
|
|
Topic |
|